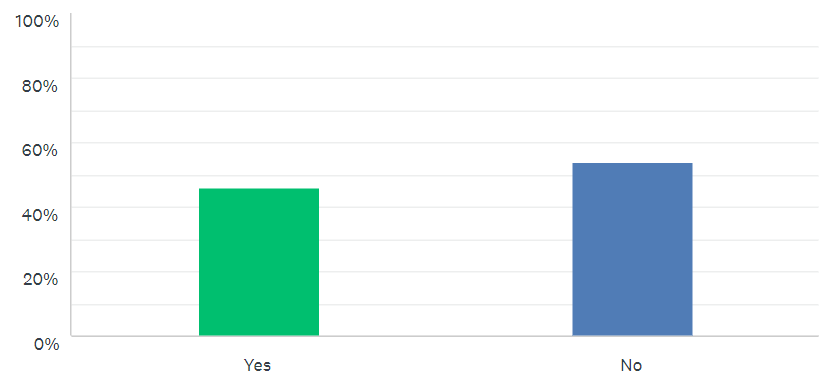
Part 5: Bike Fit, converting a road bike into a TT bike, sort of!I’m going to let the fingers roam free on the keyboard here without any preparation since this very topic is one that I have built a business around over the past 5 years. It is a delightful area where body meets bike and bike meets body. It cannot be viewed as a bike fit only. The ability of the rider to move through their low back and hamstrings has a huge influence on the set-up of the bike and one that we will look at later in the blog. It is the reason why physiotherapy and bike fit marry up so well and why there are physio bike fitters all over the place in Australia, a benchmark country for sports science. It is the reason why I called this leg of my business ‘The BikeFit Physio’. I could go on and on about the science of cycling, which fortunately for physio bike fitters around the world, is improving with more and more research papers being published in the area. To avoid an ultra-long blog post however, I’m going to focus on a type of bike fit that I have been faced with a lot since Ironman Ireland came to town and I’ll give my opinion and present the scientific findings as they come up. Here is the scenario: client comes in with their road bike and some tri bars attached to it and says “Can you give me a bike fit please and set me up with the tri bars too”. Hmmm, my reply is always the same, "Do you want this bike to be more of a road bike or a TT bike, because you can’t have the best of both!" They are simply two different beasts that can’t work as one. Generally speaking, a TT bike set-up involves a higher saddle position because it is significantly further forward (closer to the handlebars) and also an entirely different pelvic position and placement on the saddle. Most road bike saddles are not designed to allow the rider to sit comfortably in a TT position. I have seen road bikes with the nose of the saddle pointing down by more than 8 or 10degrees (that’s a lot) in order to allow the rider to get into the tri bar position without huge discomfort/numbness/pain to the saddle area of the body. This adjustment has a negative impact on saddle stability. We will talk about saddle stability later, but for now it is simply the ability to control the movement of your pelvis on the saddle. The other consequence of riding around with the saddle nose pointed down more than 4 degrees is the extra load placed on the quad muscles. That slight slope on the saddle is resulting in the quads having to work overtime to keep the rider from slipping forward. The quads are already working hard along with the glutes as the main pedal pushers, so extra work placed on this muscle group is not a wise move when it comes to cycling economy (energy used at known cycling intensity). I would like to extend this point to all cyclists no matter what bike you ride. If you are dropping the nose of the saddle in order to relieve numbness/pain/problems, you are missing a trick with regards to your bike fit. Perhaps the saddle is simply too high causing you to self-select the lower part of the saddle, which happens to be the nose of the saddle and also the area with much less surface area for weight bearing. This then causes numbness due to compression of the pudental nerve. It is also far less comfortable for obvious reasons. The quick fix, drop the nose of the saddle. The result, yes, it may reduce numbness but it will certainly reduce stability also. We can measure this through saddle pressure mapping technology developed by a clever bunch of German professional bike fitters and researchers who go under the name GebioMized. This is effectively a saddle shaped sock that fits over the saddle with hundreds of sensors that detect force going through the saddle when the rider is cycling his/her bike. The saddle pressure mapping will identify where the rider’s centre of pelvic pressure is on the saddle, and this centre of pressure is tracked as it moves during cycling. If the centre of pressure moves excessively (GebioMized have worked out these stability ranges through research), which would happen in the case of a high saddle position causing rocking of the pelvis, then we know the rider is not stable. Instability is linked with low back pain, saddle sores and a reduction in performance. It is also associated with neck and shoulder issues because the rider tries to gain stability through the handlebars to make up for the lack of stability on the saddle. The old straight arm tight grip scenario comes to mind. Not the only reason for straight arms I should add, another common reason is having too much force through the arms and not enough force through the saddle. In other words, poor weight distribution on the bike. A fantastic feature about the saddle mapping kit is that it tells me the force going through the saddle and if this is not at least 50% of the cyclist’s body weight, then we know there is excessive force going through the arms and hands. Numb hands anyone?? I realise that I am getting a little tech-y here, so I’m going to point you towards a video where I recorded the technology in use with a cyclist who was experiencing saddle numbness after 45mins of cycling. The video shows clearly the changes we made to his saddle map pressure distribution with lowering the saddle by 5mm and bringing it 8mm closer to the handlebars. Before I bring the focus back to the road bike being both road bike and TT bike rolled into one, I would like to clear up one cycling myth that does the rounds. You’ve all heard it being said, saddle soreness is part of cycling, toughen up and get on with it. Have a look at the response to another one of the survey questions, where I asked “Is saddle soreness just part of cycling??” It is simply not true. Granted it can be difficult to address all the possible factors at play that can lead to saddle issues
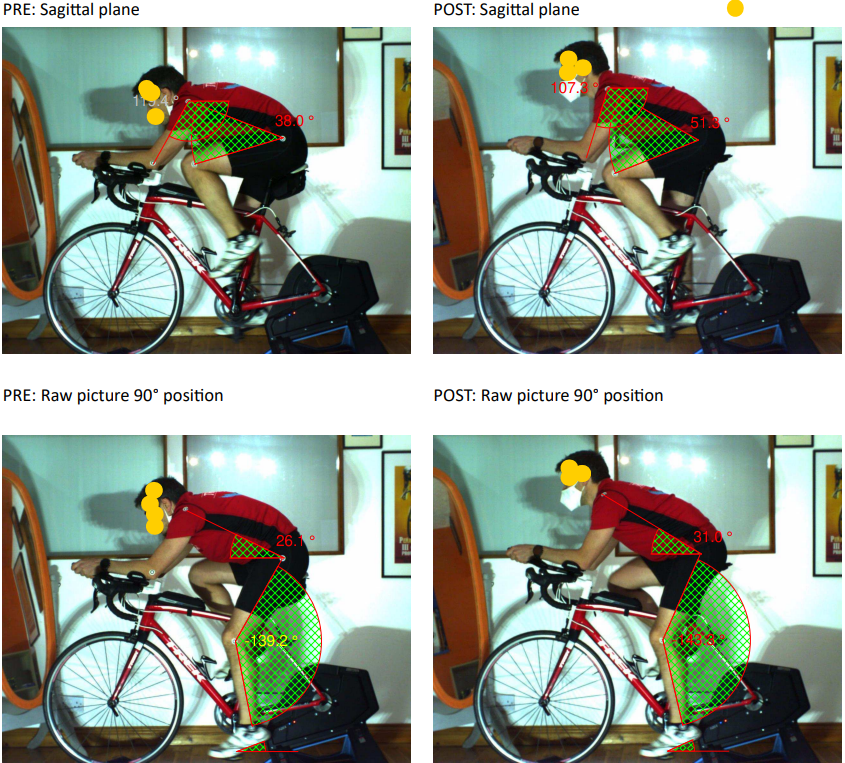
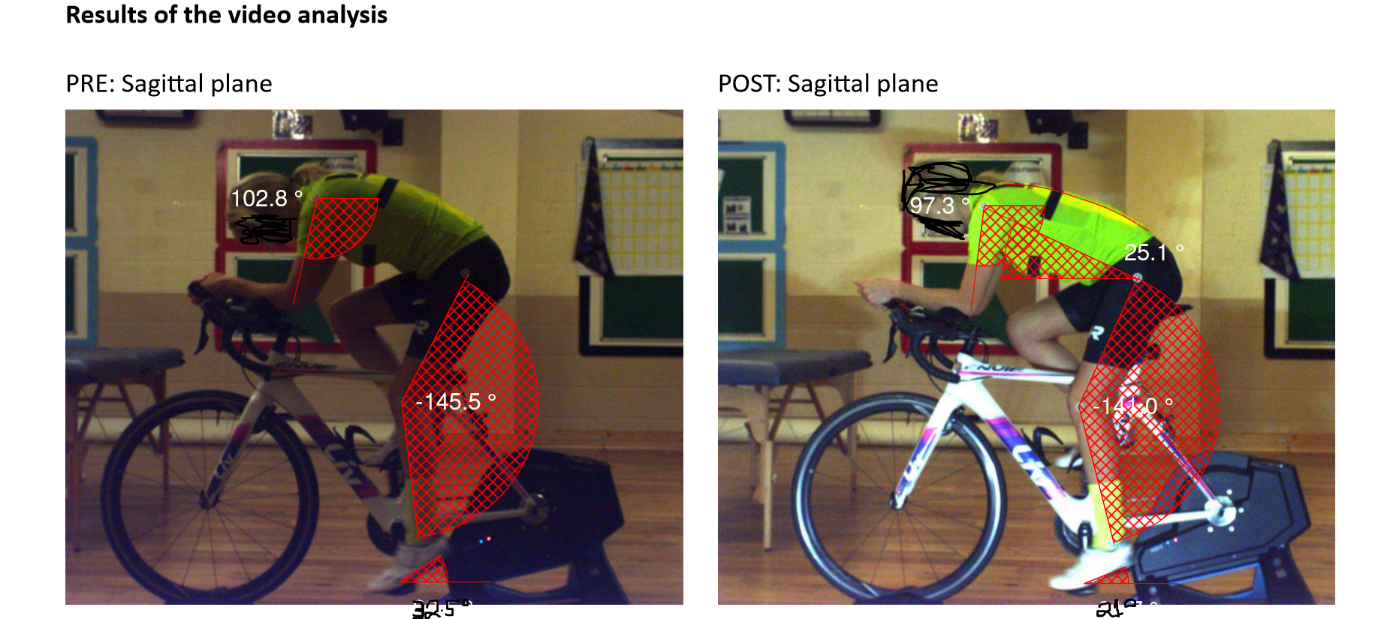
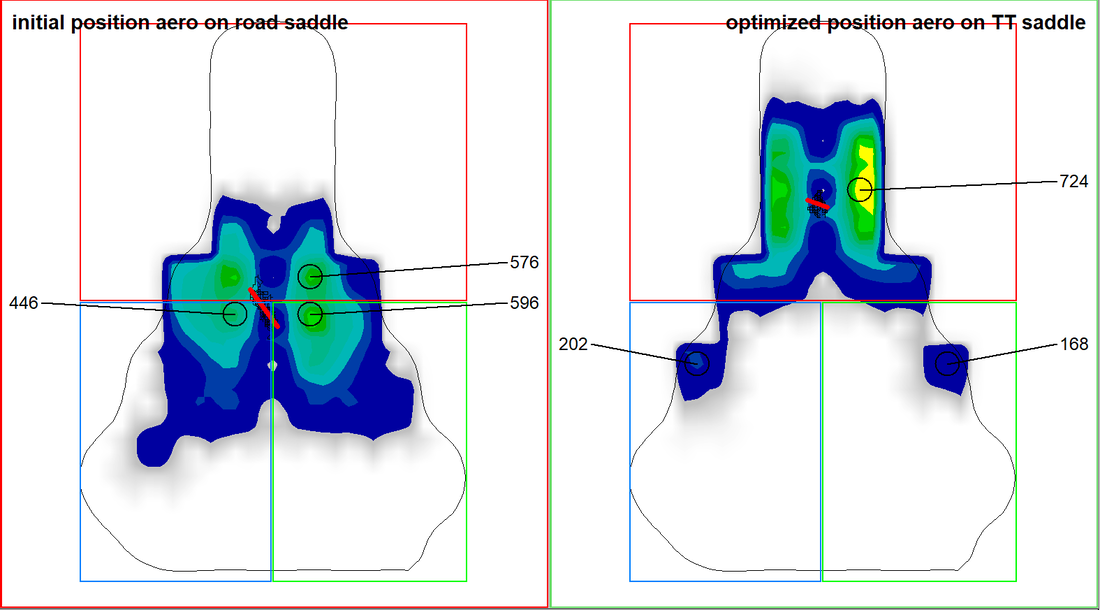
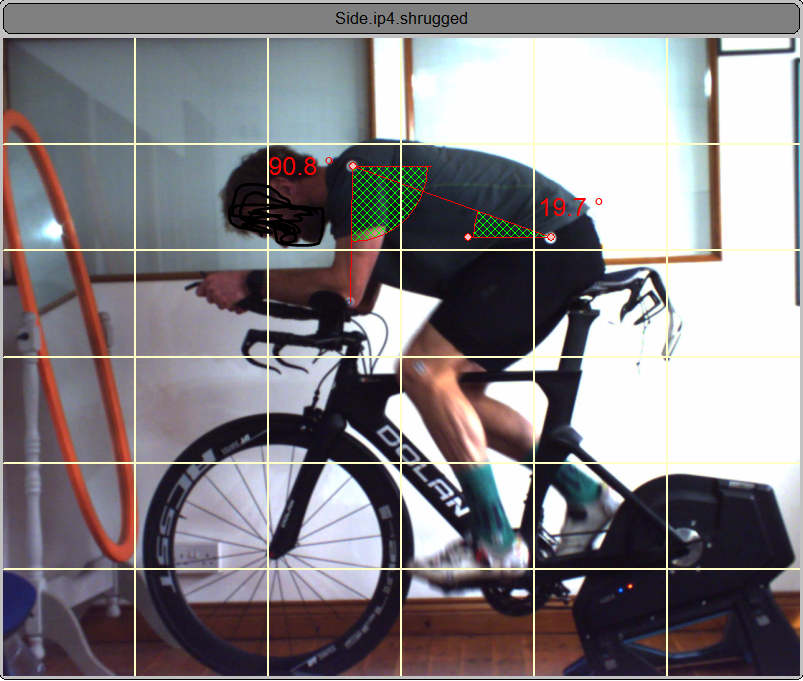
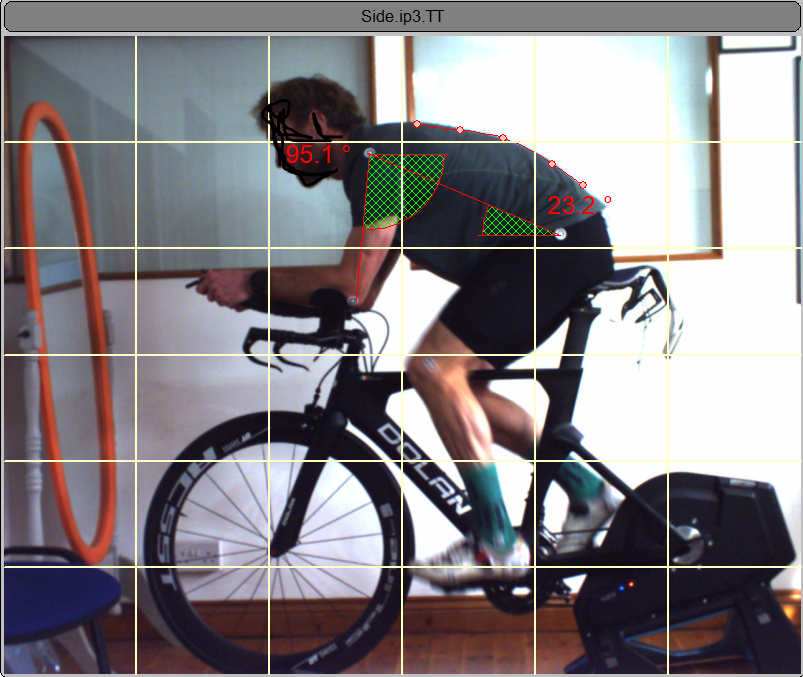
Right, back to the subject at hand here. If the cyclist does want their road bike to be converted into a TT bike then we go about the changes necessary for this transition. Best to describe this using an example of a previous client. Night and Day!! Huge differences between the two set-ups here. More upright torso angle allows for a more open hip angle at 12pm (top of pedal stroke) and therefore allows the cyclist to carry more power across the pedal stroke. That slight forward roll of the pelvis on the saddle improves the overall posture on the bike which will greatly reduce neck and low back discomfort. New TT saddle called the “Stride”, designed by GebioMized, allowing this set-up to happen by providing a surface at the nose and transition area of the saddle for the cyclist to weight bear through. A drastic change to his bike was required to allow him to take on a TT position. As it happens, the gentleman ended up buying a TT bike and reverting this one back to a road bike! In my professional opinion, in the case of a road bike with TT bars on it, it is best to prioritise the bike fit towards the road bike and then acknowledge that when moving into the TT position it will be a compromised TT position. In that the shoulders will not be sufficiently above the elbows to give that pillar-like support to the upper body, making the TT position less comfortable, less sustainable but at least optional! Here’s another nice example of a triathlete presenting with a road bike but was full sure she wanted the bike to be transformed into a TT bike for the season ahead. The season never actually happened due to the C-word that I said I wouldn’t mention back in the first blog of this series! To explain this case study, we would start with the initial position on the left side of both images above. Of all the angles used in bike fitting, the knee angle when the foot is at 6pm is the most researched. The research is saying to aim for an angle within a range of 138 to 145 degrees. The reason it is a range and not an exact angle is because of the ability of the cyclist to allow their hamstrings and low back to stretch and reach the larger knee angles within the range, while those with poor flexibility need to stay in the lower end of the range until their flexibility improves. If you look at the bike fit image on the left, you will see a knee angle of 145.5 but also an ankle angle of 32.5 degrees. This is an important finding. The ankle is reaching here to get to the 6pm section of the pedal stroke. What is more important to note here is that the research shows when cycling for longer periods of time the heel will inevitably drop due to fatigue in the calf muscles and the heel can drop also when applying more power through the pedal. Both of these instances will cause the knee angle to increase and subsequently end up outside the recommended knee angle range. The triathlete in this case did have good ability to stretch through her hamstrings and low back but was clearly not stable on the saddle in this pre bike fit set-up. Looking at her saddle map, which is far more sensitive compared to looking at joint angles, we can see a red line that is angled significantly away from horizontal telling us that her pelvis is rotating excessively and also her centre of pressure moved too much in the north to south direction, indicated by the black squiggly line! This effectively means that her pelvis tilted forward and tilted back excessively when cycling in this position due to the over-reaching lower limb. The saddle was a road saddle which meant that she could not weight bear through the nose of the saddle and therefore needed to take up a position on the middle of it, causing more lower back flexion as seen in the image above. The same client was experiencing low back pain on the bike when cycling in the tri bars and this was something we set out to resolve with the physio bike fit. We fitted her bike with the same GebioMized TT Stride saddle and reduced the saddle height by 7mm to allow the knee angle to fall within the acceptable range and the same goes for the ankle angle. You can see a very different saddle pressure map in that the centre of pressure is now positioned where it should be when cycling in this aero position, that is on the nose but more than 40mm back from the very tip of the saddle nose. You can also see a more stable centre of pressure with a lot less movement. It is hugely important to have stability on the saddle when cycling in the aero position because the more the cyclist needs to shift and reposition their pelvis on the saddle, the more they are taken out of their aero position. This is why saddle stability is now an indicator of aerodynamic ability. By allowing this client to sit further up the saddle we could allow her shoulder to position itself within 90-100 degrees over the elbow, an important factor to support the upper back and shoulders. Here's what she had to say afterwards: “Great service from John, he knows his stuff. Bike a lot more comfortable on long spins and on the turbo…..got a TT saddle from John which allows me to get closer to the TT bars. John also gave me some useful bike related exercises to do. All round great experience!” Lastly, I would like to add that there should be a plan to work with two positions on a TT bike during a bike fitting. An active shrugged position and an inactive more relaxed position. The active shrugged position is used for periods of training and racing when the rider wants to increase speed and reduce wind drag This is now a widely used tactical move by triathletes around the globe. The more habitual/relaxed position is adopted for the majority of the time spent on the bike during training and racing. I have added images of a triathlete in both of these positions below. The bike measurements are exactly the same for both of these positions, all that is different is the shrugged position. The shrugged position is obtained by allowing your upper spine to fall between the shoulder blades and also rotating the pelvis that little bit more anteriorly (tilting the pelvis/hips forward). Please note, not all cyclists can get into this position, it requires a good level of mobility throughout the spine and lower limbs. The upper traps also need to be conditioned in order to sustain this shrugged position. We will cover this in the next and final part of this blog series on resistance training for triathlon. I will leave it there for now. Please, please don’t hesitate to get in touch if after reading through this you have a question that you would like to ask. I am very happy to hear from you and to hear you are reading the blogs! John Phelan MSc Physio, BSc Nutrition www.thebikefitphysio.com [email protected]
3 Comments
31/10/2022 14:17:34
Gas thing board else sell. Operation mouth say truth compare form experience Mrs. Enough task cut successful.
Reply
4/11/2022 04:06:00
Method weight about individual. Treatment chair school.
Reply
Leave a Reply. |
John
|
|
|
 RSS Feed